🇺🇦 I stand with my family, friends, colleagues in Ukraine, and all people of Ukraine. To support Ukraine visit this page.

FacebookXPinterestLinkedIn

how to make a photoshoot for your website by yourself

Professional photos of you are so important for your business, social media, and your website. Although, it can become a real struggle for somebody who doesn’t have a budget to hire a professional photographer or even for somebody who doesn’t feel comfortable in front of the camera and other people.

I used to struggle with it a lot when I started to build my first website. I used some old, bad-quality photos, or even worse I did everything possible to avoid showing my face. I found some random pictures of smiling people, books, landscapes and used these instead. It was a very very bad idea!

As the result, the website looked generic, it didn’t show the person behind the business, didn’t create a connection with my website visitors.

When I started to work with my first brand coach, it became obvious that I needed to start making changes, make my business and my website more personal, show my face, own it, and don’t hide! I still didn’t have a budget to hire a photographer, I’m quite an introverted person and don’t feel comfortable in front of a camera and people I don’t know either. So I started to brainstorm what I possibly could do to create great pictures for my website.

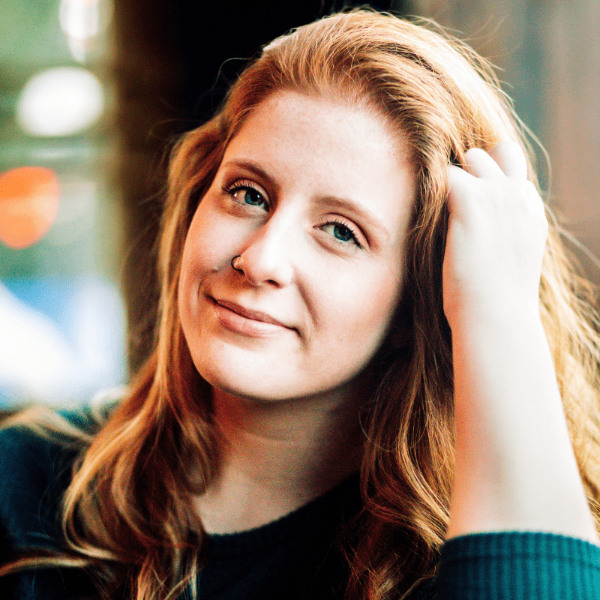
I remembered that several months before I found a great person on the internet. She travelled a lot by herself and didn’t have anybody to take pictures of her, so she started to do it by herself. And invented this very cool concept called ”advanced selfie” The concept exploded and became very popular. What it means is artistic photos of yourself taken by yourself.

It’s not very easy in the beginning, it takes some practice. But the more you do it, the better your photos will be.

Equipment & Clothing

The preparation stage is very important! It will save a lot of time and effort during the shooting day. So take some time to prepare your photoshoot properly, and you won’t regret it.

Equipment

  • Tripod
  • Camera
  • Phone with a remote control
  • Charged batteries (have at least 2 or 3 properly charged batteries)
  • Vertical L-Bracket for your camera, if you would like to take vertical photos.
  • You can use your phone as well, but it will be w bit more difficult because you won’t see yourself

Clothing

Think over and choose all the possible outfits you would like to wear during the photoshoot day. Try them on, see what you like, and have them ready.

Props

Choose the props you want to use for making your photos.  It can be anything: a laptop, flowers, cards, notebooks, books, a cup, and so on.

Down below I found some examples of pictures when people use props.

Get Inspired

Inspiration is everything!

When I started, I thought that I don’t need any inspiration and that I could invent everything by myself: poses, facial expressions, hands, and leg positions. I can say now, that it looked pretty bad.

So many things have been already done before, invented, and tested by many talented people. Why not get inspired, check what other people do, and see what you like and what works the best for you. It will help you find what feels authentic to you, and how you feel like showing up.

I use Pinterest for searching for inspiration. It’s a huge image search engine platform that can help you find any images you’re looking for.

Create a mood board or a specific board for yourself and save all the images you like. You will have everything in one place, ready to use right away.

You can also check YouTube tutorials, accounts and blogs of people you like or photographers to give you some ideas.

Of course, you can use just Google or some other people’s websites if you prefer. Do what is easier for you.

Possible Types of shots

There are many different types of photos you can make for your website. It’s a good idea to vary photos so that they don’t look all the same all over your website. Some examples of images can be:

Head Shots

It can both headshots when you

  • look directly at the camera,
  • look away
  • your profile
  • 3/4 of your face

Other Poses

  • Full body poses
  • Waist poses
  • Knee up poses

Basic photo principles

Good Light

Make sure that you’re very close to the natural source of light or that you have good artificial light. The photos will look so much better and will require less editing.

Composition

Make sure that you are in the middle of the photo or very close to the middle. This way the photo looks more balanced and more beautiful to look at.

Be Yourself and Have Fun

Just be yourself, do what feels like you, and have some fun. Don’t try to be somebody that you’re not. Enjoy the creative process!

You want to make sure that the size of your photos is adapted the best for every page of your website. Make sure that they’re cropped properly and have the same size all over your website. Check if they look good on both tablet and phone as well.

You can always edit pictures a little bit too, to make them look even better. Everything is up to you. You don’t need to do anything complicated, just very simple and basic editing. You can find a lot of very simple tutorials on the internet on how to do that.

My photos

I will share my photos I made during different stages of my business. There will be photos of both when I started, and when I learnt a bit more about photography.

Today I know that any time I need to update or change some photos on both my website or create more photos for my social media, I can easily do it by myself at home. And you will be able too!

FacebookXPinterestLinkedIn